 PrintPiperOpen app
 SPREADSHEET PRINTING GUIDE
How to Print Labels from Excel Without Word
To print labels from Excel without Word, import your .xlsx or .xls workbook directly into a saved PrintPiper template. Choose your data sheet and column-name row, connect the columns, then generate and download a print-ready label PDF. Each row fills one copy of your template — for address labels, mailing labels, product stickers, or Avery 5160 / 8160 sheets — entirely in your browser.
Before you start: XLSX, XLS, CSV and TSV data files are supported. Sign in with Google and save a template first. Choose individual label pages or Avery 5160 / 8160 sheets with 30 labels per Letter page. Your workbook stays on your device; PrintPiper does not send it to a server. The Excel-to-PDF workflow runs in your browser without installing Word, an add-in, or a mail merge macro.
Convert Excel rows to a label PDF without Word
Excel’s Save as PDF exports worksheet cells as arranged on the sheet; it does not automatically merge each data row into a separate label. You could manually lay out a sheet, but a data-to-template workflow avoids that. Use the workbook as the data source instead: keep one record per row, then import the XLSX or XLS table into a saved PrintPiper template. In the editor, choose a Preset for fixed Avery stock such as 5160 / 8160 or 8167 / 5167, or set the Frame finished label size plus the Page paper size and printer margins for custom labels — the finished label is placed 1:1 on the paper, never scaled to fit.
After the template is saved to your account, use Import CSV / Excel, pick the sheet and column-name row, connect the columns, then choose Print-ready PDF and Generate files to download. Print at Actual size / 100% — no Word, add-in, or macro. The steps below cover the same workflow in detail; for mailing-list layouts see the address labels guide, and for SKU and inventory codes see the barcode labels guide.
See the PDF, then try your own spreadsheet
Download the fictional sample without signing in. To make your own batch, sign in, save a template, import Excel or CSV, connect columns and export PDF. Free includes 10 records per export. The 30-address sample PDF is a preview; select up to 10 rows to try it on Free.
Word Mail Merge vs the PrintPiper browser workflow
A traditional way to print labels from Excel is Microsoft Word Mail Merge. Keep the Excel workbook as the data source, pick a label supplier and product number in Word, place merge fields such as {{Name}} and {{Address}} on the document, finish the merge, preview, and print. That workflow — often described as “mail merge from Excel to Word” — is documented in Microsoft’s label mail merge guide. Word handles the label layout, merge, and printing.
Many people also ask “how to create labels in Excel” itself. Excel does not have a built-in label layout. To make labels in Excel you either size a worksheet so cells match the label sheet (which loses its usefulness as a spreadsheet) or use the spreadsheet as a data source for Word or a label designer. With PrintPiper, import the workbook, design one label, and turn each spreadsheet row into a printed label.
| Step | Word Mail Merge | PrintPiper |
|---|---|---|
| Data source | Excel workbook connected as Word’s recipient list | Original XLSX or XLS workbook, chosen sheet and header row |
| Layout | Word document with a label template and merge fields | Saved PrintPiper template with reusable {{Variable}} fields |
| Where it runs | Microsoft Word | Your browser, online — no Word install required |
| Output | Word prints directly, or you finish and merge to a new document | Print-ready PDF, PNG images, or TIFF images, downloaded as files |
| Mailing label sheets | Built-in Avery / label supplier templates inside Word | Avery 5160 / 8160 with 30 labels per Letter page and starting position |
| Repeating the batch | Re-open the merged document, refresh fields, print again | Re-import a fresh workbook into the same saved template |
PrintPiper does not automate Word. It does not run a Word mail merge, send your data to Microsoft, or require Word to be installed. The Excel-to-PDF workflow runs entirely in the browser using your saved template and the imported workbook.
PrintPiper supports Avery 5160 / 8160 address-label sheets as well as individual label pages, custom product stickers, name badges, and personalized documents. Use it when you want to place spreadsheet values on your own PDF or image design. For mailing-list work specifically, the address labels guide covers the address-block layout and ZIP-code details.
1. Prepare one row per label in Excel
Use unique, nonempty column names and one record per row. The first row is the simplest place for column names, but you can select a later row if your workbook starts with a title or notes. Unmerge cells in the data table. Store postal codes and long identifiers as text before entering them to preserve their digits.
| Name | Address | City | State | PostalCode |
|---|---|---|---|---|
| Alex Example | 12 Sample Lane | Exampleville | MA | 01234 |
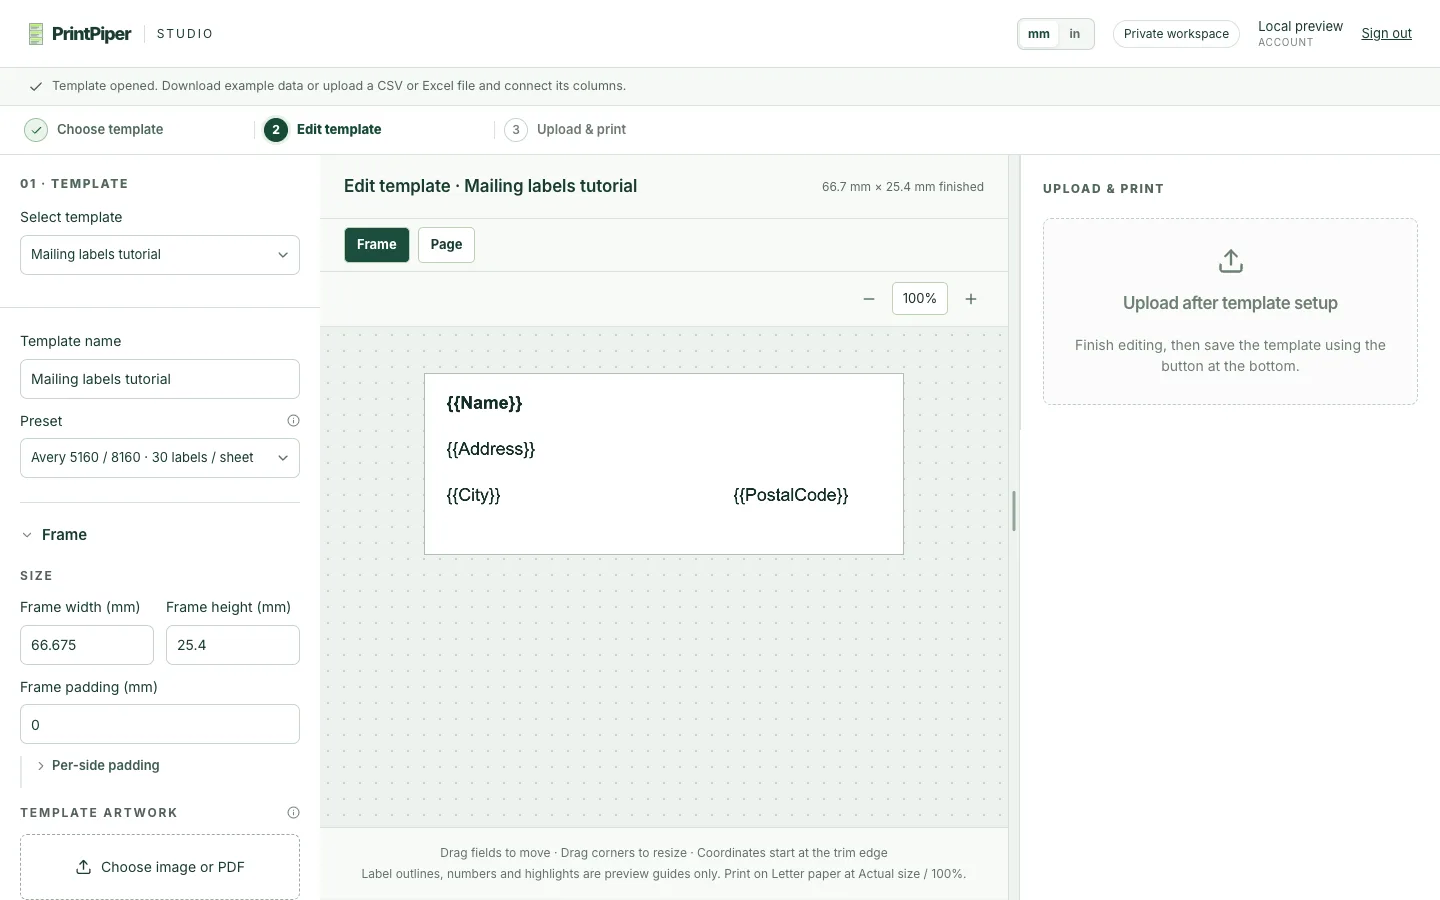
Add one text field per value and bind exactly one variable to each field. Give every field an explicit width and height, then position the fields on the label:
| Text field | Variable | Width × height | Place it on |
|---|---|---|---|
| Name | {{Name}} | 60 × 6 mm | First line, left |
| Address | {{Address}} | 60 × 6 mm | Second line, left |
| City | {{City}} | 30 × 6 mm | Last line, left |
| State | {{State}} | 14 × 6 mm | Last line, after City |
| PostalCode | {{PostalCode}} | 18 × 6 mm | Last line, after State |
City, State and PostalCode sit side by side on the last line, so their positions alone set the spacing. No field ever holds more than one variable, and PrintPiper adds nothing between fields — append a comma to the City value if your label style uses one.
To print a conventional block from a single cell instead, put the whole multiline address in one spreadsheet column, such as a FullAddress column, and bind one {{FullAddress}} field to it. A cell may contain line breaks and the field prints them as written. Never mix two variables, or a placeholder with fixed text, in the same field. Barcode and QR code fields follow the same rule: one variable per field.
The example row prints as:
Alex Example
12 Sample Lane
Exampleville MA 01234
2. Save your workbook as XLSX or XLS
Save the workbook on your device. There is no need to convert it to CSV. PrintPiper reads cell display text, including date, currency, percentage and zero-padding formats. CSV remains an option if you prefer a simple text file. The imported workbook and its cell values stay on your device; only saved template artwork and settings are uploaded.
Recalculate formulas and save in Excel before importing. PrintPiper reads saved formula results; it does not calculate formulas, run macros or follow external links. Encrypted workbooks, XLSM and XLSB are not supported. Save an unencrypted XLSX copy for this workflow.
3. Create the template and add your fields
Open PrintPiper and use Select template for an existing design, or New template to create one. Start blank or add a PDF, PNG, JPEG, WebP, or TIFF as template artwork. These are design files; your workbook supplies the variable data.
Add text fields with reusable variables such as {{Name}} and position them on the label. Choose a Preset for fixed Avery stock, or set your own sizes: Frame holds the finished label dimensions and Page holds the paper size and printer margins. The finished label prints 1:1 at the chosen alignment — it is never scaled to fit the paper. Connect variables to your real columns after importing the workbook.
If an imported design already has text in that area, Cover existing template text covers the field rectangle. Check that it does not cover nearby artwork.
4. Save, import Excel, and choose your column names
Click Save template at the bottom of the editor, then select Import CSV / Excel in the right panel and choose your workbook. If there is only one visible sheet, it is selected automatically. Otherwise, choose the Excel tab containing the records you want to print.
Click the preview row containing column names such as Name, Address and PostalCode. The highlighted row supplies the names; records begin below it, and empty rows are skipped. Click Import records. The setup section then collapses. Use Change import settingsto select another sheet or column-name row later.
Template artwork and settings are saved to your account. Workbook files, sheet names, cell values, mappings and generated files stay on your device. If you edit the template, save it before generating again.
5. Generate, download, and print at 100%
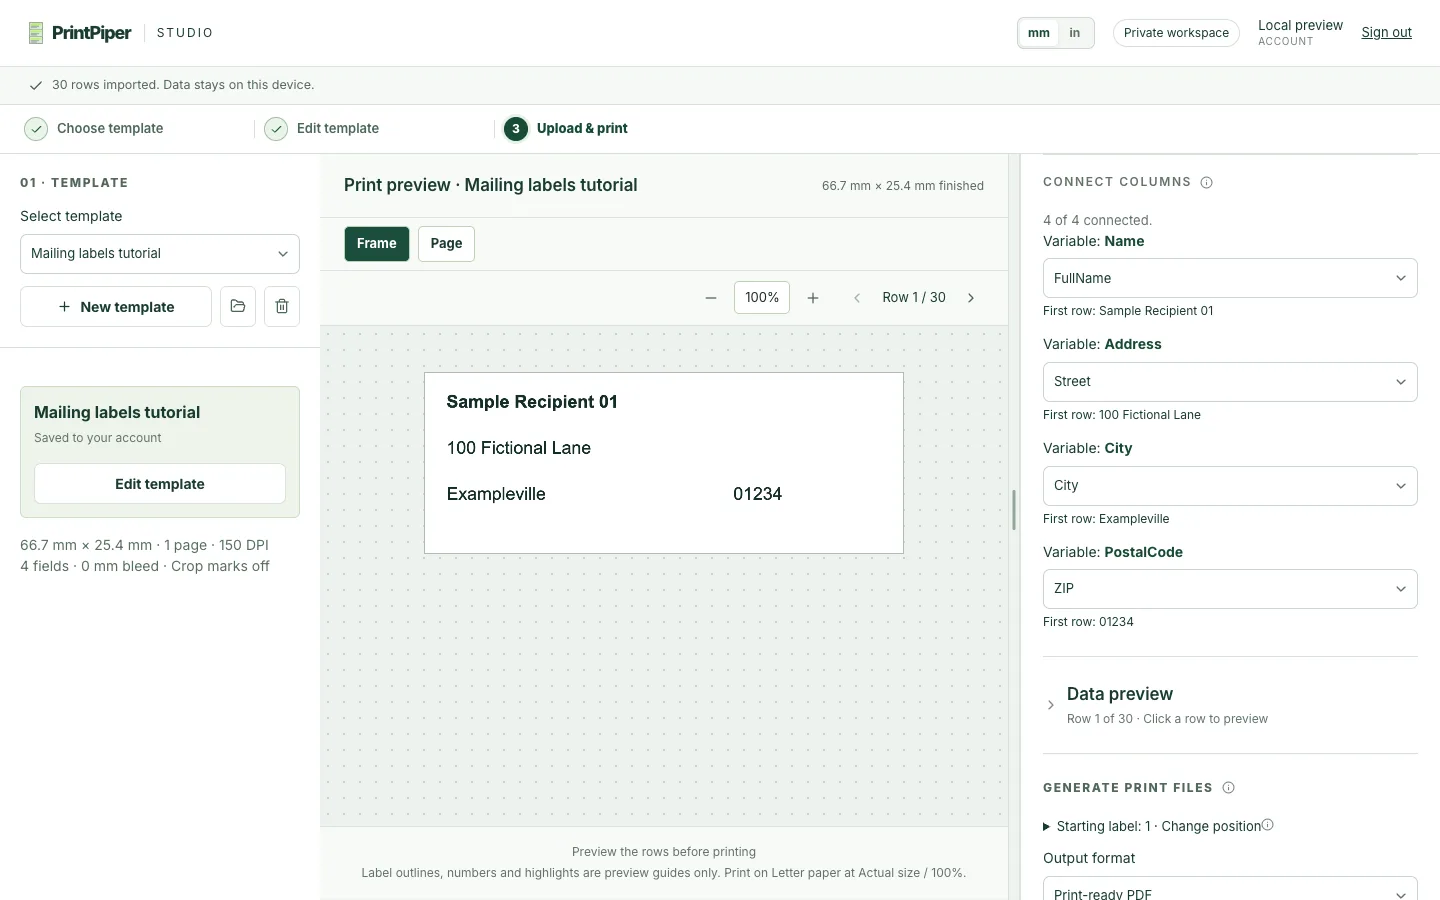
In Connect columns, exact names match automatically; map differently named columns manually. Check several preview records, including the longest names and addresses. Choose Print-ready PDFand a row range, then click Generate files. Watch the progress or cancel if needed. Once ready, each file shows its name, size and a Download button. The downloaded PDF is your Excel-to-label output — there is no Word step in the middle.
Print the exported PDF at Actual size or 100% with matching printer paper dimensions. Start with one test label. Printer margins, bleed and crop marks must fit on the selected paper. For print-then-trim designs, check both paper and finished dimensions; changing crop marks does not enlarge the paper.
Larger PDF batches produce separate PDF parts, each with its own Download button. PNG and TIFF output use ZIP parts. Download every part before leaving the page or generating another batch. For large jobs, Generate and save directly to a folder is available in supported browsers.
Common Excel-to-label problems
Work through this table from the top. Excel-specific checks: headers must be unique and nonempty, and the highlighted row must be the column-name row, not a title or the first data record.
| Problem | Likely cause | What to do |
|---|---|---|
| Postal codes lost leading zeroes | The zeroes were already gone in the source before import, for example a number-formatted cell or a spreadsheet that dropped them on CSV export. PrintPiper cannot restore digits that are not in the file. | Fix the source column so it is plain text, re-enter the values, download the CSV or XLSX again, then import the new file. |
| A variable shows no value | The template variable is not connected to a CSV or Excel column, or the header row was not selected. | Open Connect columns and map every variable. Export stays blocked until each used variable has a column. |
| Long text is cut off or crowds the label | The field is smaller than the longest value in the batch. | Check the longest records in the preview, enlarge the field or enable Shrink text to fit, save the template, and generate again. |
| PDF prints too small or too large | The print dialog scaled the page, for example Fit to page or a non-100% scale. | Print at Actual size or 100% on the paper size shown in the export, then measure a single test label before printing the batch. |
Why is a formula cell rejected?
A formula needs a saved result. If a result is missing or a cell contains an error, PrintPiper identifies the cell and stops the import. Fix it, recalculate and save in Excel, then choose the updated file again.
Can I print Avery 5160 or 30 labels per sheet?
Yes. Choose Avery 5160 / 8160 · 30 labels / sheet, design one label, and import your Excel data. Records fill the 3 × 10 Letter grid from left to right. You can choose a starting position on a partly used sheet and adjust X/Y print alignment. Follow the Avery 5160 / 8160 guide and print a plain-paper test at 100% first.
How large can my workbook and batch be?
Data files support up to 10,000 records and 200 columns, with a 15 MiB input limit. Excel data must be within the first 20,001 worksheet rows. Workbooks with large amounts of compressed content or display text may reach additional limits sooner. Paid plans allow up to 10,000 records per export; Free allows 10. Each export supports up to 10,000 output pages, subject to image and archive limits. A multi-page template uses more than one output page per row; select a smaller row range for large batches.
Try the complete 30-label example with downloadable CSV, mapping and a generated PDF.
Frequently asked questions
Can I print labels from Excel online without Word?
Yes. PrintPiper runs the Excel-to-PDF workflow in your browser. There is no Word add-in or desktop label software to install. Open the app, sign in with Google, import your XLSX or XLS workbook, and download the label PDFs.
How do I make mailing labels from an Excel spreadsheet?
Use the Avery 5160 / 8160 · 30 labels / sheet Preset, design one label that includes the mailing address fields, save the template, then import your Excel mailing list and connect the Name, Address, City, State, and PostalCode columns. Each spreadsheet row becomes one mailing label on the printed Letter sheet. The address labels guide walks through this mailing-list version of the workflow.
What about XLSX files specifically — do they import directly?
Yes. XLSX is supported directly alongside XLS, CSV, and TSV. There is no need to convert an XLSX workbook to CSV first; PrintPiper reads the original .xlsx file, lets you pick the worksheet, and uses the displayed cell values.
Does PrintPiper run a Word mail merge for me?
No. PrintPiper does not open, drive, or integrate with Microsoft Word. It does not perform a Word mail merge, and it does not send your data to Microsoft. The browser workflow uses your saved PrintPiper template and the imported workbook to generate the label PDF directly.
How can I create labels from an Excel spreadsheet?
Keep one record per row in Excel, then use the workbook as the data source for a label layout. Word Mail Merge can place Excel fields in a Word label document. PrintPiper instead imports the spreadsheet into a saved browser template and creates the label PDF without Word.