 PrintPiperOpen app
 SPREADSHEET PRINTING GUIDE
Print Name Badges & Name Tags from Excel or CSV
Create event name tags and badges from Excel, CSV or a Google Sheets snapshot by saving one badge design, importing your attendee list, and connecting name, company and role columns. PrintPiper generates a personalized PDF page for each attendee, ready to print at your chosen badge size for a conference, workshop, meetup or training day.
For workshops, meetups and community events: start with the five-person example below, then reuse the saved design for your next attendee list. This 90 × 60 mm example produces one badge per page, not a pre-cut multi-badge sheet.
See the PDF, then try your own spreadsheet
Download the fictional sample without signing in. To make your own batch, sign in, save a template, import Excel or CSV, connect columns and export PDF. Free includes 10 records per export.

Prepare names, companies and roles
Use one row per badge and separate columns for Attendee, Organization and Role. Review capitalization and preferred names before generating. If a person needs two copies, duplicate the row. The importer does not deduplicate guests or expand quantities.
For Excel, choose the visible worksheet holding the final attendee list and identify the column-name row. For Google Sheets, download a CSV or XLSX snapshot; you do not need to share the spreadsheet or install an add-on.
Import an attendee list from Excel, CSV or Google Sheets
Registration tools such as Eventbrite, Google Forms and Luma export a guest list as CSV or XLSX. Export one row per attendee, then import that file. Common columns are First name, Last name, Company and Job title; combine first and last name in one spreadsheet column if you want a single {{Name}} field, or add two fields on the badge.
PrintPiper reads the file you import and does not connect live to a registration service, so re-export and re-import after late sign-ups. Each row prints once; duplicate a row when one person needs a spare badge. Attendee files stay on your device and are not uploaded with the saved template.
Choose a badge or name tag size
Measure the insert or holder before you design. The example uses 90 × 60 mm, a common credit-card-style event badge, but you can enter any custom size in millimeters or inches. If you print onto a pre-cut sheet, choose the size that matches the stock rather than the holder’s outer frame, and print at Actual size / 100%.
The name badge and name tag wording describe the same job. “Name badge” is more common for conferences and corporate events; “name tag” is more common for classrooms, churches and volunteer days. Both are one personalized design per attendee.
Design around the name people need to read
Make the attendee name the largest field. Keep the company and role smaller, and leave room around the edges for your badge holder. Measure the insert rather than assuming the holder’s outer dimensions are the paper size.
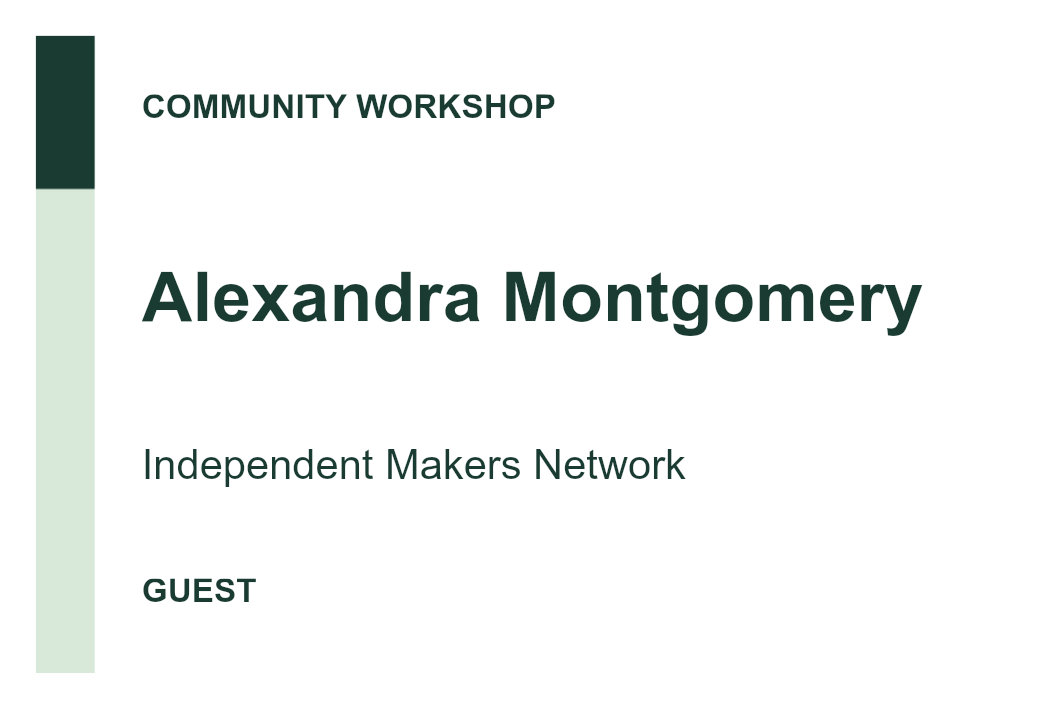
The sample uses 90 × 60 mm paper, a green accent and a fixed event heading. Event artwork repeats across the batch; each spreadsheet row changes the text. Choose different physical dimensions if your stock requires them.
A five-record example you can reproduce
All names, businesses and records in this example are fictional. Five records fit within the Free plan’s 10-record export allowance. Sign in and save this as your active template before importing the data.

1. Create the design
Choose New template. Set the Frame to 90 × 60 mm and the Page to 96 × 66 mm at 300 DPI, with 3 mm printer margins on each edge. Choose one sheet, centered alignment, zero padding, bleed and crop marks off. Under Template artwork, click Choose image or PDF, add the blank artwork above, and choose Fit inside. Print on matching paper at 100%; the frame is placed 1:1, never scaled.
Text field positions and styling
Static wording is part of the deterministic artwork. Variable fields each hold exactly one variable; positions are measured from the upper-left of the Frame. Use transparent background, dark green text (#193b31), and Shrink text to fit. Preset is optional and under the editor's Preset control.
| Field / variable | X / Y (mm) | W × H (mm) | Type |
|---|---|---|---|
| Name {{Name}} | 12 / 23 | 70 × 12 | 23 pt bold, left |
| Company {{Company}} | 12 / 38 | 70 × 6 | 10 pt, left |
| Role {{Role}} | 12 / 49 | 70 × 5 | 8 pt bold, left |
Download full template settings for reference. Recreate these settings in the editor; template JSON is not an app import format.
2. Save, import and connect columns
Click Save template. In the right panel, choose Import CSV / Excel and select the example CSV. Under Connect columns, use the mapping below. Matching names connect automatically; the other connections are manual.
| Variable | Column | First value |
|---|---|---|
| {{Name}} | Attendee | Alex Morgan |
| {{Company}} | Organization | North Studio |
| {{Role}} | Role | HOST |
Download the mapping reference. Connections apply to this batch and are not saved in the template.
3. Preview, generate and download
Select the first row, then the fifth row to check the longer values. Choose Print-ready PDF and rows 1–5, click Generate files, and wait for completion before clicking Download. The result is five pages, one for each record.
4. Test on the matching paper
Print at Actual size / 100%, with printer paper matching 96 × 66 mm. Measure one test print before using your final stock. This example uses one centered design per page; it does not arrange several badges on a larger sheet.
Name badge questions
What happens to a very long name?
Shrink text to fit can reduce the font size inside the field. Check the fifth sample record, Alexandra Montgomery, and the longest name in your own list. If it becomes too small to read, expand the field or simplify other content.
Can I create several badges on one A4 sheet?
Yes. Keep the badge dimensions in Frame, choose A4 or Letter in Page, then select Grid sheet under Images per sheet in Layout. Rows and columns auto-fit the printable area using your gaps and alignment; the badge is never scaled to fit. The example still exports one badge page per attendee; the grid mode fills one sheet with consecutive attendees instead.
Can different attendees have different photos or QR codes?
Spreadsheet mapping replaces text. A background image is shared by the whole template; per-row images and QR generation are not part of this workflow. Name, company and role can vary for every attendee.
Will my attendee list be uploaded?
Your workbook, CSV rows and generated files stay on your device. Saving the template uploads its artwork and field settings to your account. Keep personal attendee details in the imported file, rather than typing them into reusable template artwork.
What size are conference name badges?
There is no single standard. 90 × 60 mm and 4 × 3 inch inserts are common for lanyard holders, while classroom name tags are often smaller. Measure your holder or pre-cut stock and enter that size; PrintPiper does not snap to a fixed badge preset beyond the sizes you choose.
Can I import an Eventbrite or Google Forms attendee export?
Yes, when the export is CSV or XLSX. Import the file, then connect the attendee, company and role columns. PrintPiper does not sign in to Eventbrite or Google Forms, so export a fresh file after the guest list changes.
How do I reprint one badge after a last-minute change?
Keep the saved template, fix the row in your spreadsheet, and re-import the file. Select only the rows you need so the new batch contains just the corrected badges, and print at Actual size / 100%.
Is this a name tag or name badge maker?
It does both. The workflow is identical: one row per person, one reusable design, and a PDF page per attendee. Choose the wording and size that fit your event.
See the Excel import guide for worksheet selection or the Google Sheets guide for snapshot export.